Device Setup Guide
This guide walks you through connecting, verifying, configuring, and troubleshooting your Polyglossia gateway device. If you get stuck at any point, reach us at support@polyglossia.io.
Initial Device Setup
There are 3 steps to setting up your Polyglossia device.
-
To ensure optimal sound quality, connect your device to either a sound system or an amplified microphone. There are two connection options available: XLR and 3.5 mm, which are indicated by yellow arrows in the accompanying image below. It's important to note that these connections have no pre-applied gain, so you may need to adjust the audio input gain for the AI system to effectively capture the sound.
Please note that the ports marked in red are not currently supported. Audio can only be transmitted through the two yellow inputs. To avoid any issues, kindly choose one of the two options and do not feed audio into both ports at the same time. If you have any questions, feel free to contact us at support@polyglossia.io.
-
Connect the power using the adapter that shipped with your device. In the image below, this is the blue arrow.
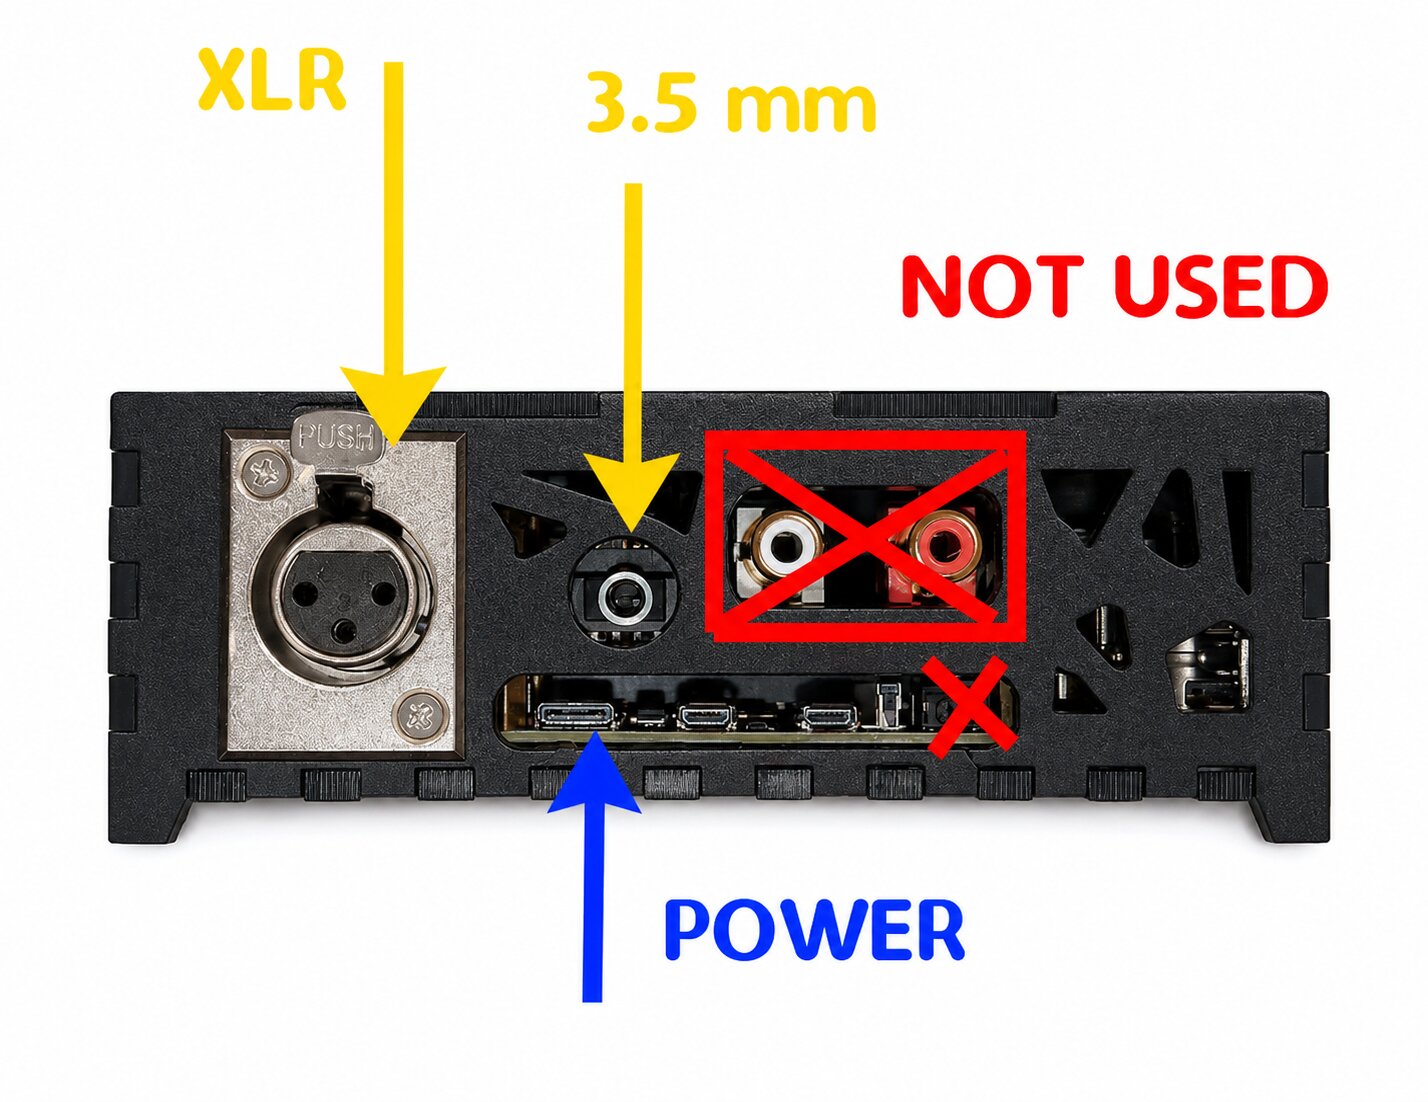
Yellow: audio inputs (XLR / 3.5 mm). Blue: power. Red: ports that are not currently supported. -
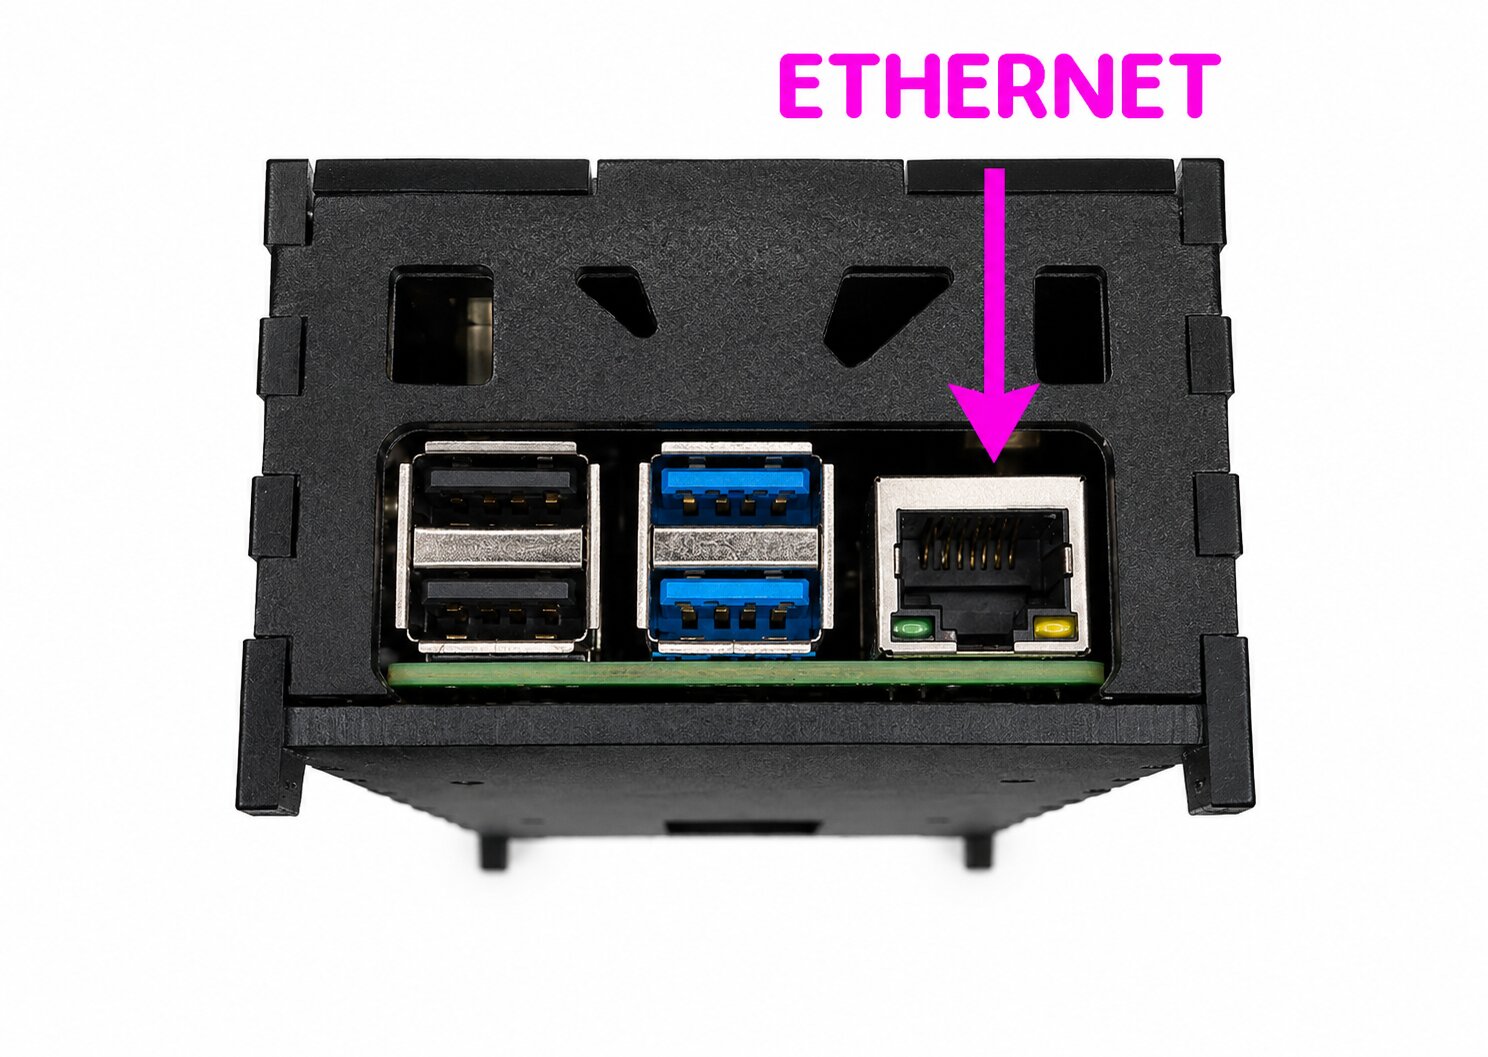
For an uninterrupted audio streaming session from your device to our servers via a VPN, it is necessary to connect it to a network that has internet access. A wired connection is the preferred method, but in case of a Wi-Fi connection, please refer to the Wi-Fi Setup section below.
Verifying Your Device's Connection
Once your device is connected to power, audio, and an internet connection, visit the device admin page to verify that it is connected successfully.
- Log in to your Polyglossia account: https://app.polyglossia.io/
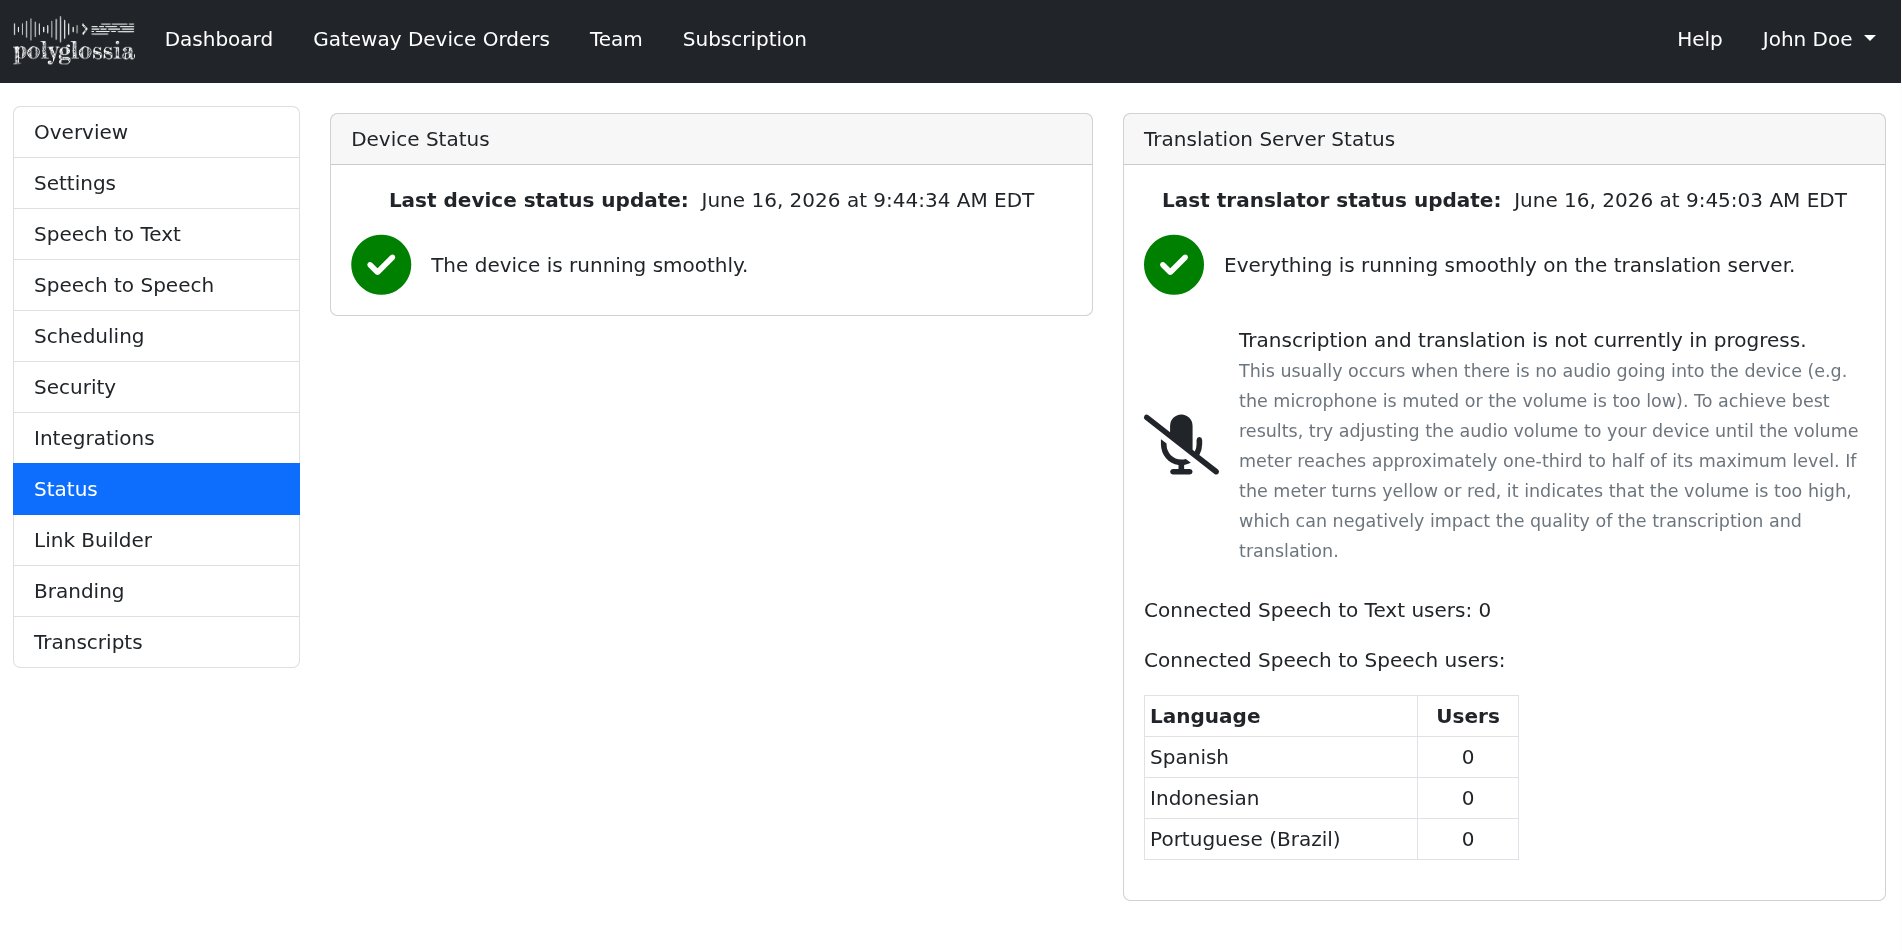
- From the dashboard, click on your device, then click on the Status tab on the left.
- Here you will see sections labeled "Device Status" and "Translator Server Status". If everything is green then you're all set up. If not, you will see an indicator that there is a problem along with some troubleshooting steps listed beneath it.
Verifying Your Volume
Polyglossia's AI transcription and translation is designed to automatically turn on when it detects incoming audio. Therefore, it is important to ensure that your volume level is set correctly. On the Overview tab of your device page, you will see a volume meter and a button to record a sample of the actual audio stream that the AI model receives from your device.
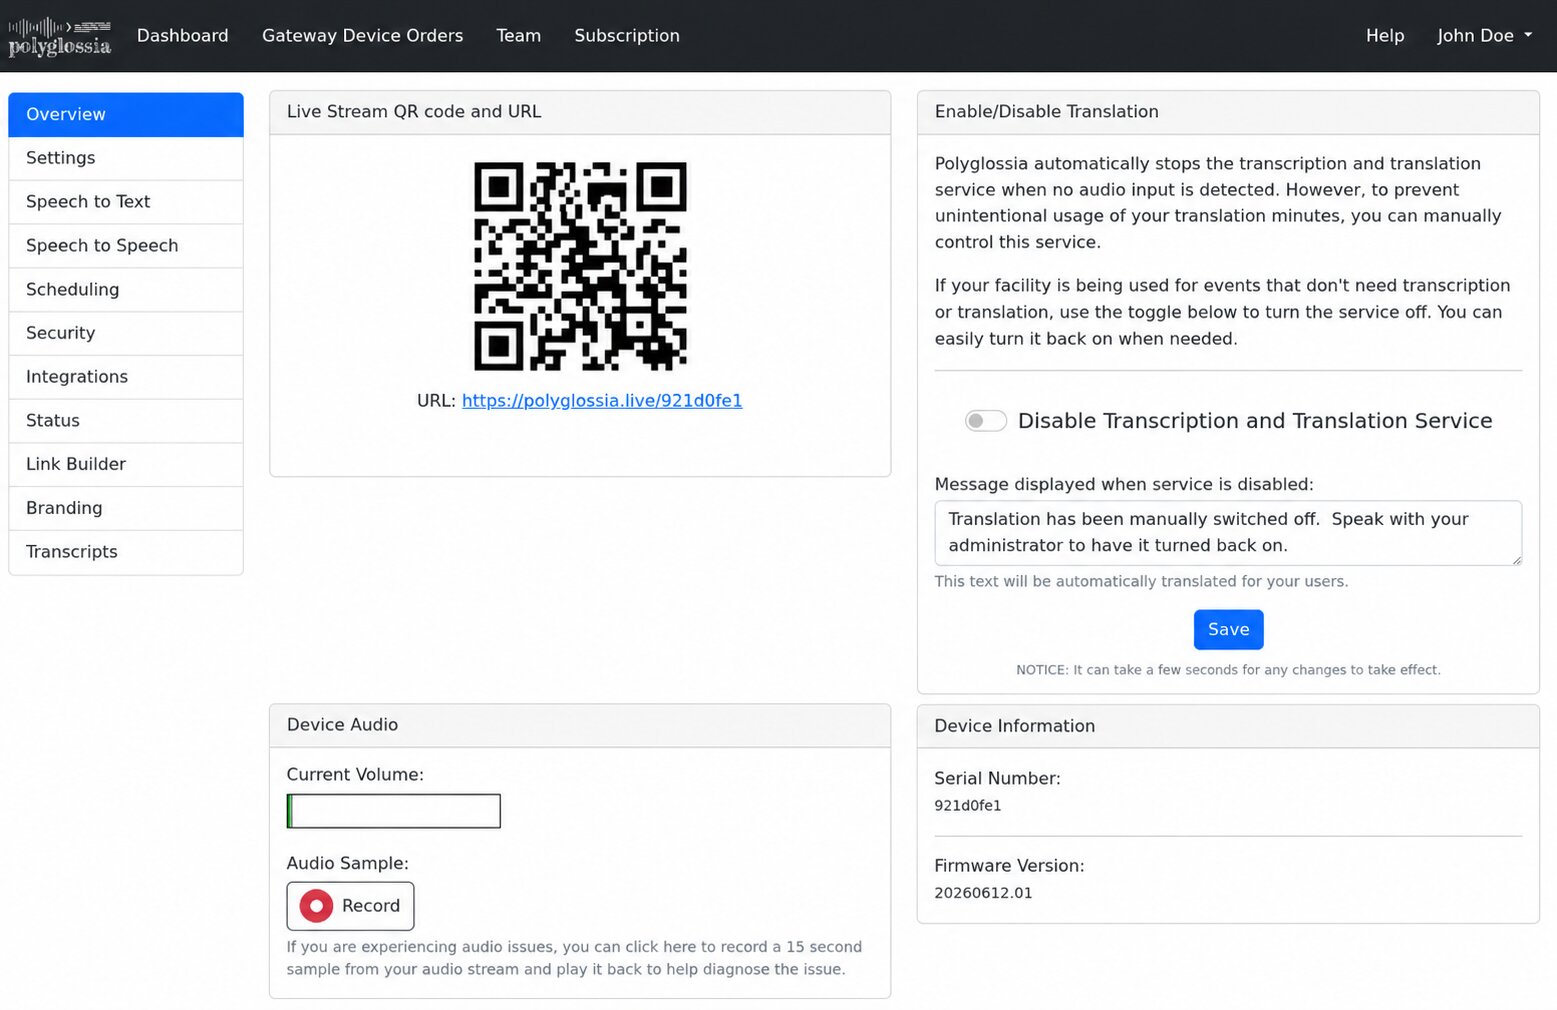
It is recommended to adjust the volume to approximately one-third to one-half of its maximum level. As you adjust your volume, you can use the audio recording tool directly below the volume meter to sample the audio. This is an effective way to ensure there isn't any buzz from a grounded XLR cable and that the audio is clear.
The system is designed to automatically turn off the translation service when it detects a lack of audio input. If the volume level is too low, the translation might stop. In such cases, it will reactivate as soon as it detects a louder sound, resulting in a cycling on-and-off pattern. Therefore, be sure to adjust your volume appropriately.
How It Works
Your Polyglossia device seamlessly processes audio content. It begins by capturing incoming audio and then converts it into a digital signal. This digital signal is sent to our remote cloud servers for real-time processing.
In the cloud, the servers handle the challenging task of transcribing the audio into text and, if your subscription includes it, translating it into the languages you have configured. Depending on how you set up your device, that translation can be delivered as on-screen text, as spoken audio, or both.
The transcribed and translated text is made accessible through a web page, which can be easily accessed from a variety of devices, including phones, tablets, laptops, and other internet-connected devices.
If you have enabled Speech to Speech, listeners can also hear the translation spoken aloud. An audio player bar appears at the bottom of the page, and they simply press play to start listening in their chosen language. They can show or hide this bar at any time from their own settings.
Users will appreciate the simplicity of our system. No additional software or applications are required on their devices. All they need is a web browser to access the transcribed and translated content. Plus, each user can personalize their experience by selecting preferred languages and adjusting settings like font size and layout.
Our system is designed to automatically engage the translation function whenever it detects audio on the incoming source. If you leave your sound system active between events, consider muting the audio feed to your device to prevent any unexpected subscription overage costs.
Configuration
Log in to your Polyglossia account at https://app.polyglossia.io/, then from the dashboard click on your device. The tabs along the left side of the device page are where you set everything up. Three of them control how your audio is captured and translated: Settings, Speech to Text, and Speech to Speech.
Polyglossia offers two ways to deliver translations to your listeners, and you can use either one or both at the same time:
- Speech to Text transcribes the speaker as live text captions and can translate those captions into other languages that listeners read on their own screens.
- Speech to Speech translates the speaker and plays the result back as spoken audio in each listener's chosen language, with matching live captions included.
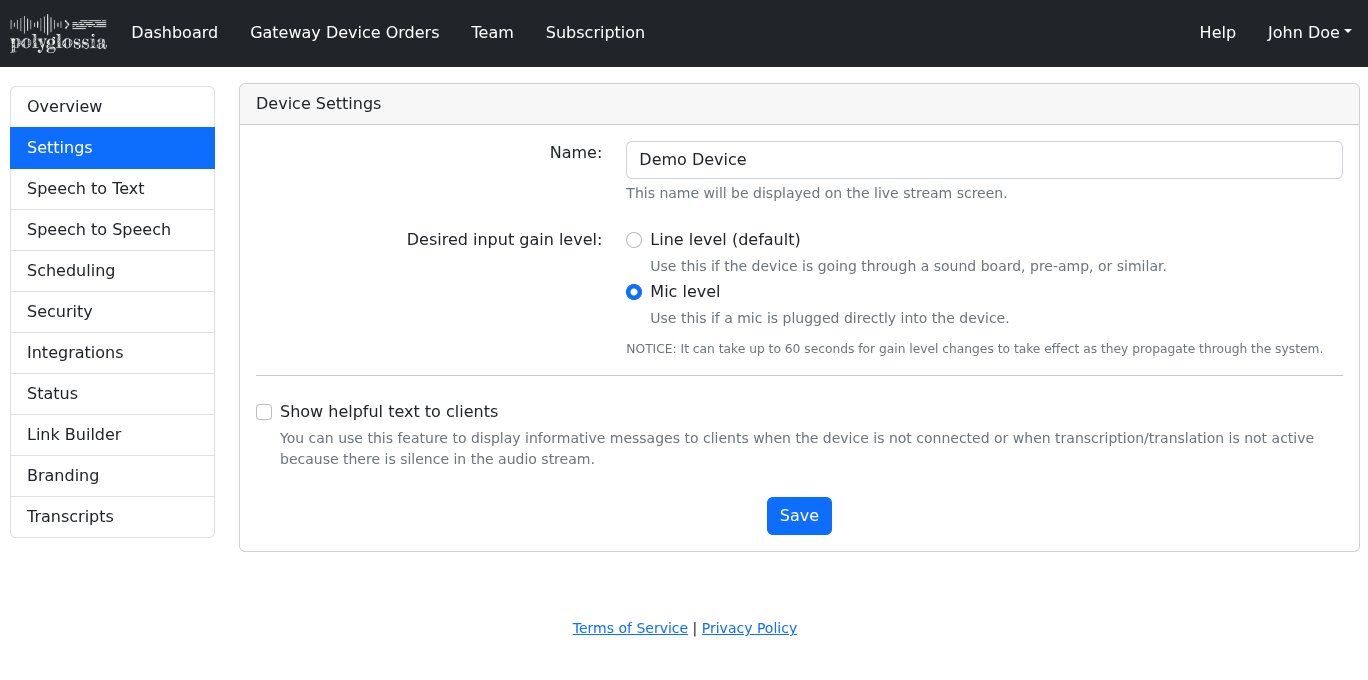
Start on the Settings tab, which controls the device itself:
- Name: a label for this device. It is displayed on the live stream screen.
- Desired input gain level: choose Line level if the device is fed from a sound board, pre-amp, or similar, or Mic level if a microphone is plugged directly into the device. Gain changes can take up to 60 seconds to take effect.
- Show helpful text to clients: when enabled, you can display a message to your listeners while the device is disconnected or while translation is paused due to silence. Turning it on reveals fields for those two messages, which are translated for your listeners automatically.
Click Save when you are done.
Speech to Text
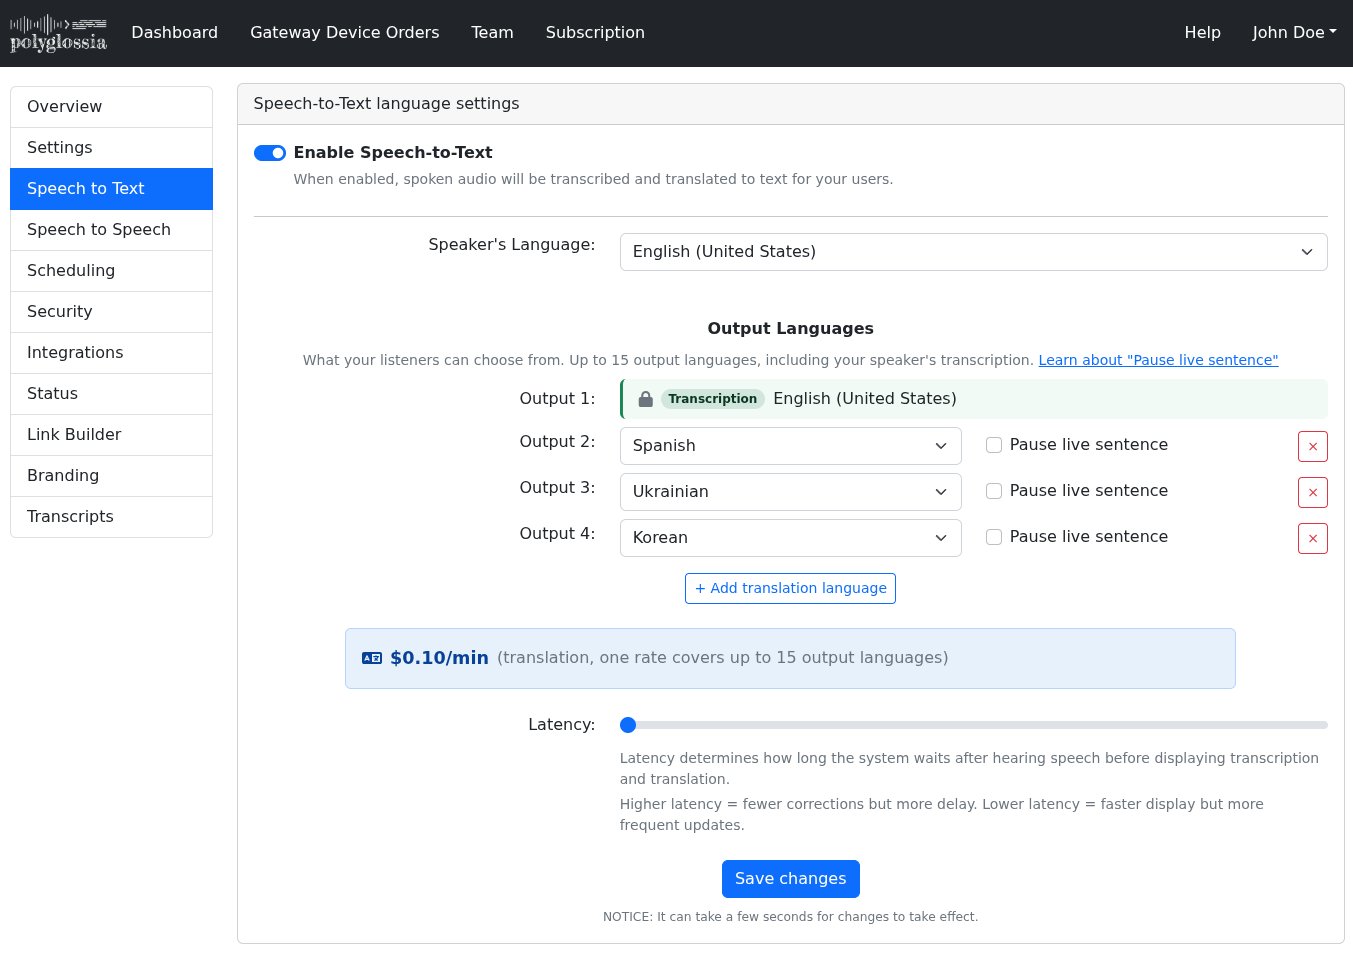
The Speech to Text tab controls live text captions. Turn on Enable Speech-to-Text to transcribe the speaker and, optionally, translate those captions into other languages.
- Speaker's Language: the language the speaker will be talking in. This becomes the transcription, which listeners see as the first output language.
- Output Languages: the languages your listeners can choose from on their own screens. The speaker's transcription is always the first output. Use Add translation language to add more, up to 15 outputs in total.
- Pause live sentence: an option on each translated language that waits for a natural sentence break before updating the text, which can read more smoothly in some languages. Use the "Learn about" link on the tab for more detail.
- Latency: how long the system waits after hearing speech before showing text. Higher latency means fewer on-screen corrections but more delay. Lower latency shows text faster but updates more often.
As you add languages, a summary near the bottom of the tab shows the per-minute price for your selection. Click Save to apply your changes.
Speech to Speech
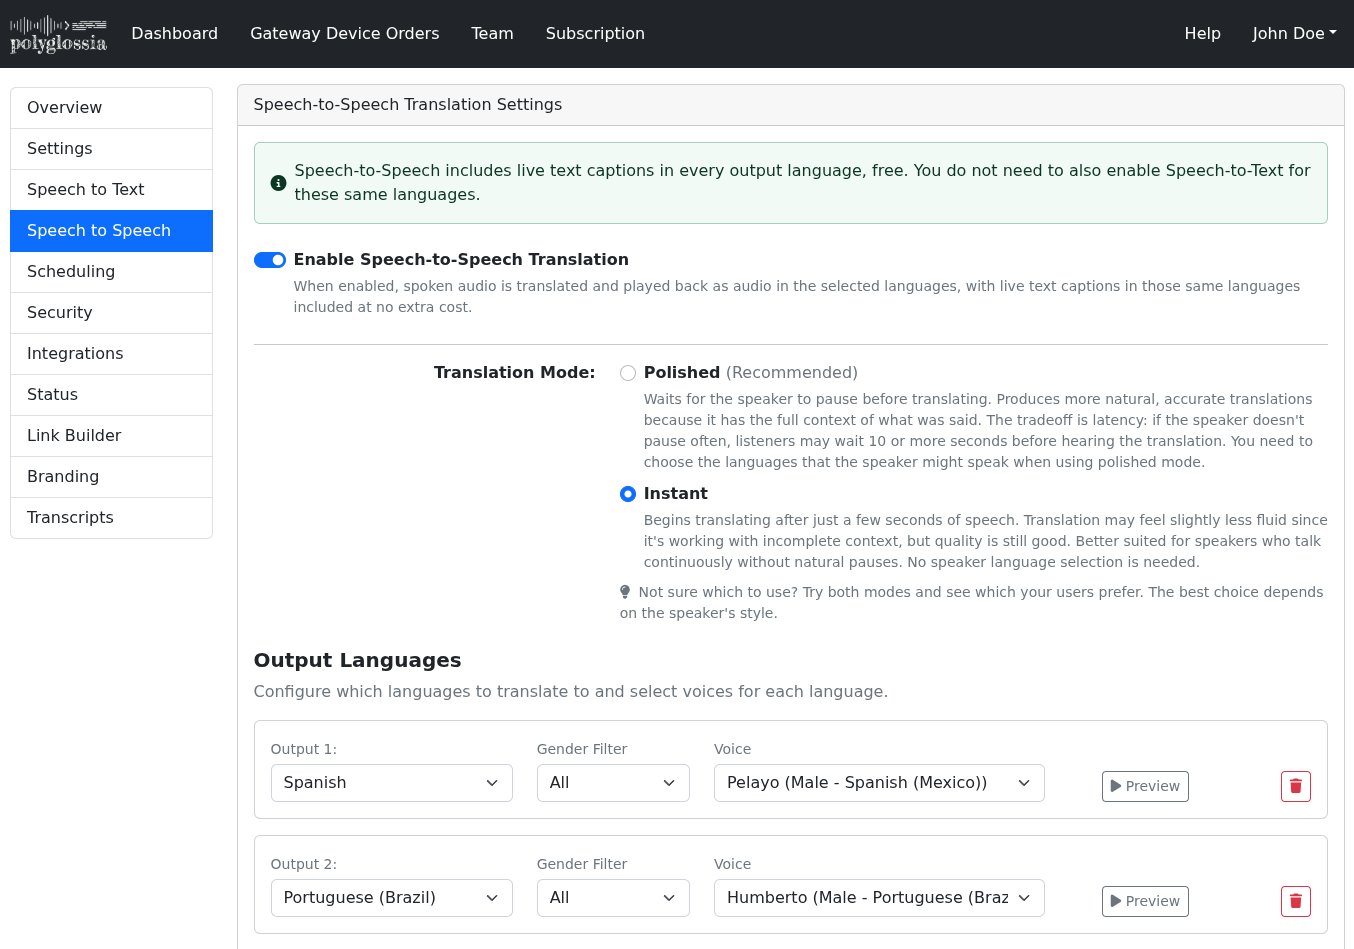
The Speech to Speech tab translates the speaker and plays the result back as spoken audio in each listener's chosen language. Live text captions in those same languages are included at no extra cost, so you do not need to also enable Speech to Text for any language you set up here. Turn on Enable Speech-to-Speech Translation to begin.
Choose a Translation Mode:
- Polished (recommended) waits for the speaker to pause before translating, which produces more natural, accurate results because it has the full context of the sentence. The tradeoff is delay: if the speaker rarely pauses, listeners may wait 10 seconds or more to hear the translation. In this mode you also select the Source Languages (up to four) that the speaker might use.
- Instant begins translating after just a few seconds of speech. It can feel slightly less polished since it works with incomplete context, but quality is still good, and it suits speakers who talk continuously without natural pauses. No source language selection is needed.
Under Output Languages, add each language you want to translate into and pick a voice for it. You can filter the voices by gender and use Preview to hear a sample. A summary shows the per-minute price as you add languages. Keep in mind that each output language uses roughly 20 MB of mobile data per hour on your listeners' phones for the audio stream.
You can also turn on Show Audio Bar by Default so the audio player is visible automatically on the translation page; listeners can still show or hide it themselves. Click Save when you are finished. Speech-to-Speech changes can take up to 30 seconds to take effect.
Wi-Fi Setup
When the Polyglossia device is not plugged into a local network and the device is unable to connect to a previously configured Wi-Fi network, the device will reboot into Access Point mode. In this mode, the device turns itself into an access point that you can connect directly to from any other Wi-Fi device such as a phone, tablet, or laptop and configure the Wi-Fi settings for the device.
It will take the device about 60 seconds to reboot and to bring up the access point. When the device is in access point mode, you will see a green LED inside the device flashing in a short-short-long repeating pattern.
From your phone, tablet, or laptop join the PolyglossiaDevice network
and open http://192.168.4.1/ in a browser. Be sure to use http, not https.
Alternately, you can simply scan this QR code to go to the address:

Then select the Wi-Fi network you wish to join, enter its password, and tap to join the network. If the network is not password protected, it will not have a padlock icon next to it.
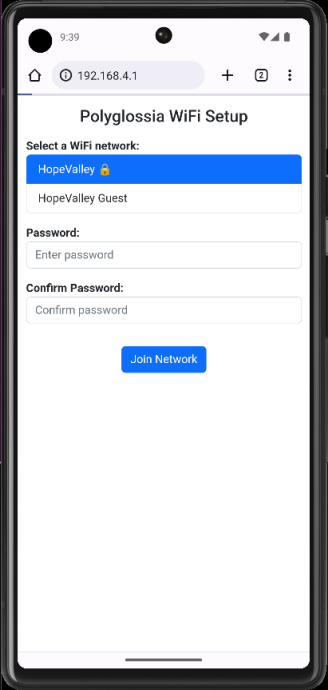
The device will then save your settings and reboot itself to go back into normal Wi-Fi client mode and join your network. This process can take 60 seconds so be patient.
If it is unable to join your network it will reboot itself back into access point mode again so that you can re-type the password or choose a different network to join.
ProPresenter Integration
If you use ProPresenter, you can optionally have your Polyglossia device connect to ProPresenter and translate the slides for your users as well. Setting this up is easy, but there are a few requirements:
- You must be using ProPresenter (Windows or Mac) version 18 or newer.
- Your Polyglossia device must be running firmware version 20250529.01 or newer. Devices will automatically check for firmware updates and update themselves at 3am and 6am US/Eastern, Monday through Saturday. If your device is running an older firmware version, just leave it powered on with internet access overnight. Contact support@polyglossia.io if you have any questions about this.
- Your ProPresenter application must have network access enabled in its Preferences.
- The Polyglossia device must be on the same local network as the computer running ProPresenter. It needs to be able to connect to ProPresenter over the network.
Once these requirements are met, you can configure the ProPresenter integration by going to the device page and clicking the Integrations tab.
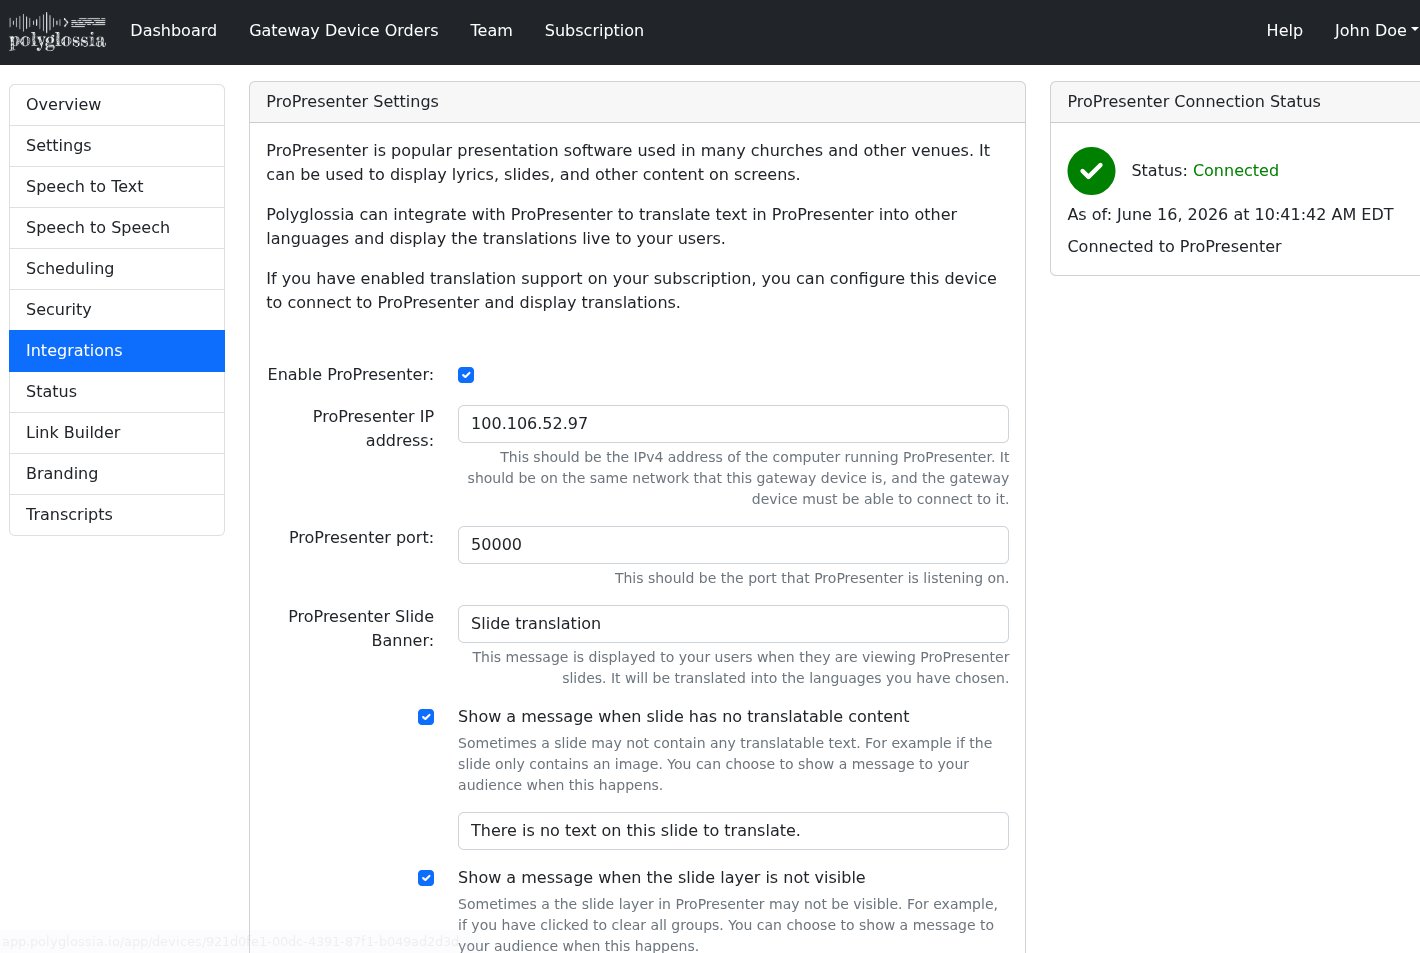
Enter the IP address and port that you see on the Network tab of your ProPresenter Preferences and click save. There is a Connection Status monitor on the right side of this page, and it will update several times a minute.
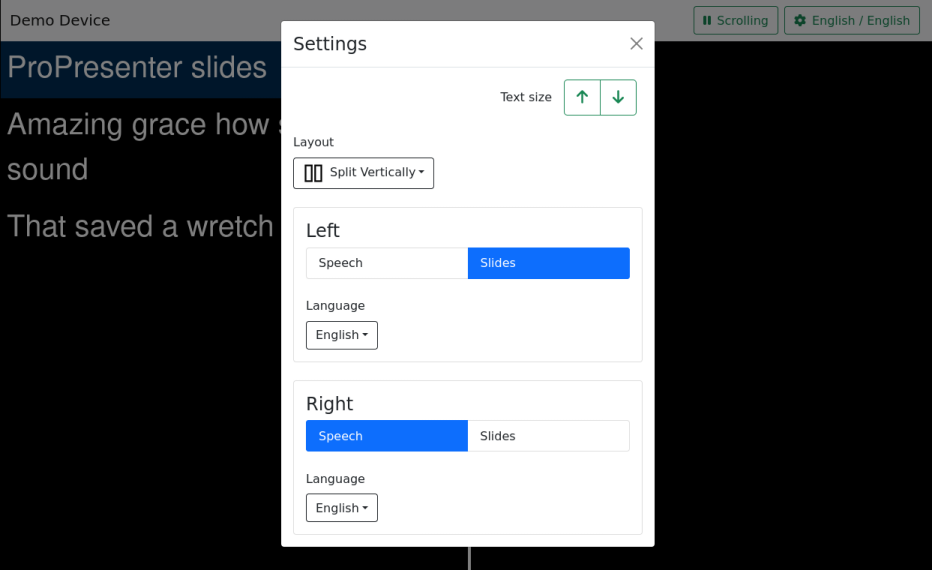
Your users will then be able to click on the gear icon in the top right of their screen and choose to see speech and slide translations side by side:
Troubleshooting
- If the device admin page shows that the Translator Server is receiving audio from your device, but you're not seeing anything on your live stream, you may not have the volume turned up sufficiently high for Polyglossia to be able to process the audio. On the device admin page, check that the volume is at least ⅓ to ½ the way up the meter. If it is pegging into the red, the volume is too high and the sound is clipping which will give less accurate results.